Author Topic: D&E .22LR 1874 Gatling Gun Build  (Read 46241 times)

  • Guest
D&E .22LR 1874 Gatling Gun Build
« Reply #40 on: March 02, 2011, 06:03:09 PM »
The mechanical polish is very similar on all the barrels but I do have concerns about matching color if the barrels are blued. I have had this problem in the past on rifles I have built from military bolt action receivers. Some components particularly on  the US 1903 and 1903A4 Springfields would come out tinted green or red if held in the light.

I guess I will just have to wait and see. If the color varies, one solution would be to iron plate the barrels in the same fashion that Winchester Arms used on their early Stainless Barrels. The barrels were polished, plated and then hot blued resulting in a deep black uniform color.

I have a 1956 stamped .243 Winchester Model 70 Bull Gun that was built in the Winchester Custom Shop around the time or just before the .243 was commerically released. This gun has a stainless barrel that is matt finished with a deep black color the matches the receiver quite nicely. This is by far the most accurate gun I have ever owned. It has fired 5 shot groups that measured under .18\" at 100 yards, (one small ragged hole). I used to shoot this gun regularly in reduced range High Power Matches until I got too old and fat to compete.

nitewatchman

  • Guest
D&E .22LR 1874 Gatling Gun Build
« Reply #41 on: March 04, 2011, 03:52:49 PM »
Hi,
  When bluing when it comes out green the temperatue is too low and when it comes out red it is too high. Some metals act at different temperatures. Especially heated metal.

  • Guest
D&E .22LR 1874 Gatling Gun Build
« Reply #42 on: March 09, 2011, 04:20:34 PM »
Cold outside today so did some more work on the BASE PLATE. I managed to get the KEY,SHORT fitted to it. There seemed to be a lot more work on the short key compared to the long key.
I still need to drill a few holes in the BASE PLATE but there\'s no rush for that.
One thing that is dawning on me, is that there is no method of securing these keys in place. I suspect they\'ll come loose when firing. If they do, I\'ll have to fit a detent to them.


Oh, I also did some more work on the 5th barrel. It\'s all turned down, but still needs some TLC with sandpaper. This one is about 0.2mm under diameter which has annoyed me slightly.

  • Guest
D&E .22LR 1874 Gatling Gun Build
« Reply #43 on: March 25, 2011, 02:18:51 PM »
I\'ve not done much on the Gatling recently as I\'ve been tied up with work. I\'ve now got 2 weeks off so aim to get all barrels completely finished. I\'ve turned no6 down and made a good start on no7.

  • Guest
D&E .22LR 1874 Gatling Gun Build
« Reply #44 on: March 30, 2011, 09:35:13 AM »
7th barrel finished being turned and going to continue with the 8th after lunch. The end is in sight!! I\'m looking forward to getting them screwcut so I can assemble them. :-)

As far as getting the same colour on different metals, I hadn\'t thought about getting them plated first. I don\'t think I\'ll need to do that, but it\'s certainly something worth remembering for future jobs. I intend to do a 7.62 Gatling at some stage and I suspect I\'ll end up with barrels from different suppliers on that.

  • Guest
D&E .22LR 1874 Gatling Gun Build
« Reply #45 on: March 30, 2011, 06:06:38 PM »
8th done!

  • Guest
D&E .22LR 1874 Gatling Gun Build
« Reply #46 on: April 03, 2011, 11:39:39 AM »
Phew. All 10 turned down and tapered now. I just need to polish the hexagonal sections on 2 of them and screwcut them all. I\'ll get some pics up soon. :-)

  • Guest
D&E .22LR 1874 Gatling Gun Build
« Reply #47 on: April 04, 2011, 05:52:24 PM »
Ok, all 10 barrels done now. I\'ve screwed them all into the BREACH RING by hand. I need to make up a tool to tighten them up still. I need to crown the barrels still. I also need to chamber the barrels but won\'t do that till later in the build.


Here the barrel assembly is almost complete. After previously deciding to alter the position of the BARREL RING I need to make a new SHAFT and FRONT SHAFT to the correct length.


Here\'s the rear of the BREACH RING. I need to cut a groove in the rear for the extractor claws of the bolts to fit into.


Here\'s the muzzle end of the barrels. I intend to lap the bolts into the BARREL RING so that they are a snug fit. I\'ll do that over the next few days with any luck. There will be a 5mm gap between the BARREL RING and the hexagonal section.

  • Guest
D&E .22LR 1874 Gatling Gun Build
« Reply #48 on: April 05, 2011, 12:10:43 PM »
I lapped the BARRELs into the BARREL RING today. Here\'s the finished result. I\'ve still not cleaned up the crown.


I think one of the next parts tp make is the body. I love machining brass, but there\'s a lot of screwcutting to be done on it.

  • Guest
D&E .22LR 1874 Gatling Gun Build
« Reply #49 on: April 06, 2011, 11:31:58 AM »
The plans I have show two breech rings, one grooved, one plain.  I grooved the barrels and used the grooved breech ring.  Later I found that the groove would allow the extractor to bend and sometimes break when test fired.  The groove also allowed the brass to expand into the space of the groove and not eject.  I then made a second breech ring without the groove and replaced the grooved ring.  I had a little trouble with alignment of the barrels but this solved the problem of the bending.  It made for a much tighter fit and I liked the look of the plain ring.
The groove in the barrels left so small a piece on the barrel that it broke off when fired.  I removed it and cleaned up the barrels.  
I made my bolts to be able to be used in any position.  On my rebuild I am going to follow your lead and fit them into only one position.  I made bolts by silver soldering the lug and by turning the lug.  I prefer turning in one piece.
I hope you do not have the misfiring problems I have had.

  • Guest
D&E .22LR 1874 Gatling Gun Build
« Reply #50 on: April 06, 2011, 11:39:30 AM »
I made the front shaft round at first and used brass strips to tighten it.  Since I had to remove it many times I put a flat on it.  Then I made one out of hex ss and just used a socket to install and remove.  
On a rebuild I am going to make the shaft one piece with threaded sleeves for tightening.  The shaft will be a larger diameter but cannot be seen.  It will have key ways.

  • Guest
D&E .22LR 1874 Gatling Gun Build
« Reply #51 on: April 06, 2011, 06:06:30 PM »
Here\'s a picture(below) so all can see what we\'re talking about. This only shows the BARREL, BREECH RING and BOLT.
I also had a print with a grooved BREECH RING and a grooveless BREECH RING. I assumed the grooveless one was just an extra print in the same way that some other parts have half finished prints as well as completed prints.
I can see that a grooveless BREECH RING can be used, but the barrel still needs a cut out of it for the extractor part of the bolt to go into. If there isn\'t a cut out on the barrel at least, the extractor would stop the bolt going fully into battery.


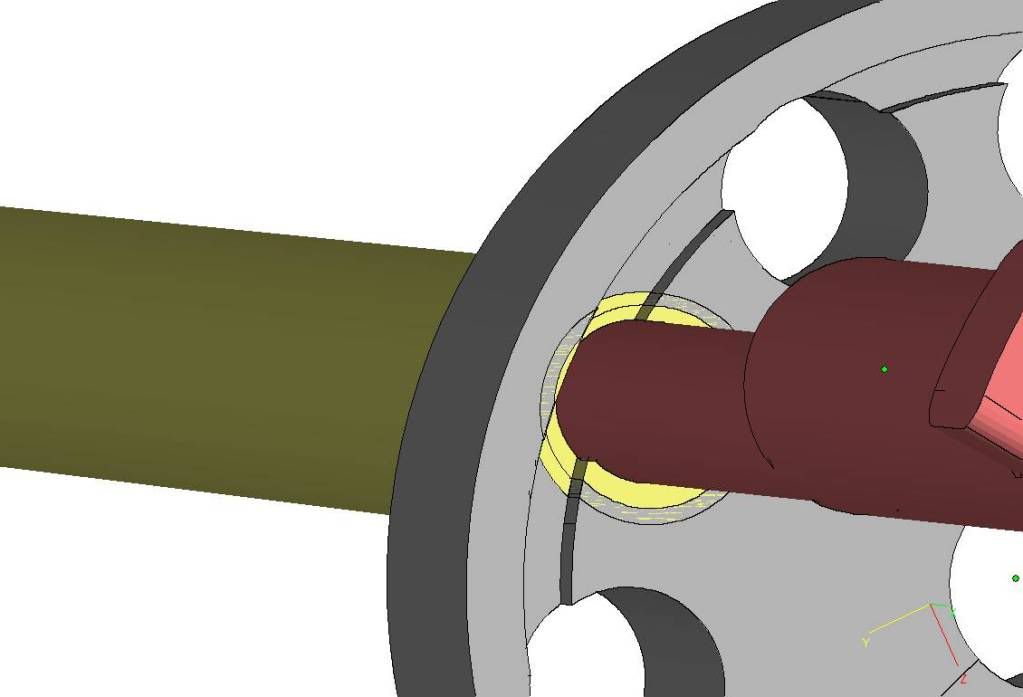
This picture(below) shows the bolt in battery and a round of ammunition in the chamber. As far as I can work out, the whole of the case is supported other than the part where the groove is which is very small (2.5mm long and about 1/3 of the circumference). Is this too much to be unsupported?
I dont see how I can support the extractor any more without a lot of work. One way would be to counterbore the barrel only on the side of the extractor and use the barrel to support the extractor. I dont think this would be viable though.
When you grooved the BREECH RING, did you also groove the BARREL, or was your barrel set further forwards so the cartridge wasn\'t supported all the way round at the rear?

I can also see the small slither of the barrel that you were saying breaks off. I\'ll make sure I remove that if I do it this way. (Thanks)

I\'m wondering if the barrel missalignment maybe weakened the extractors somehow on your first version? I\'m definitely going to pin the BREECH RING, PAN and BODY before I fit it in the BODY.


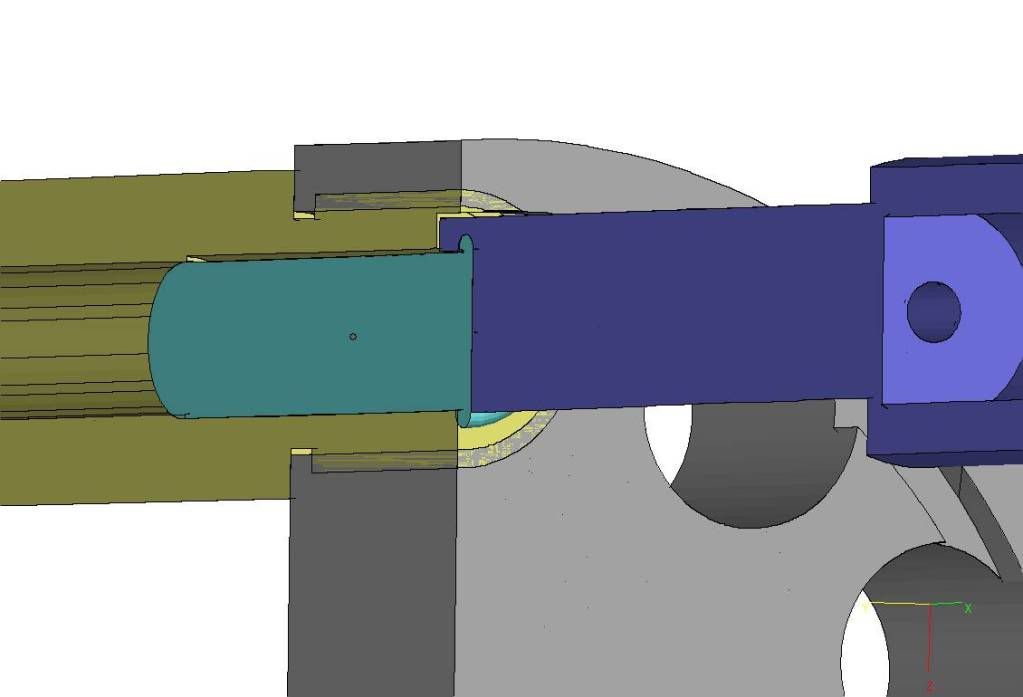
In this picture, I have added the pan and the rim stop. The rim stop limits how far forward the bolt goes (as well as the FRONT CAM)


I thought about turning the BOLTs in one go, but chickened out and had them cast. I didn\'t fancy making up the cutter for the extractor!!

I\'ve not silver soldered anything yet. It\'s one skill I\'ve not got although I might need it at some stage..... Its definitely the way forward if you want nice machined surfaces. My way entails lots of hand finishing. :-(

I think looking back, I\'d have made the main shaft out of hex bar and used a breaching tool to make the central hole on all my center holes. I may also turn a hex on the front bar in order to enable me to tighten it up. (thanks). ;-)

  • Guest
D&E .22LR 1874 Gatling Gun Build
« Reply #52 on: April 07, 2011, 05:34:34 AM »
I did not think I would have to take the barrel assembly apart so I tightened the barrels into final position as the plans showed and cut the groove on the lathe.  A trepanning tool would work well here but I am not going to use the groove on a rebuild.
After I removed the sliver on the barrel and reassembled the threads here were visible and touched the extractor.  I put the grooveless ring in a dividing head and milled out this portion of the threads.
On a rebuild I will put the barrel assembly in the mill on a dividing head and mill out the portion for the extractor instead of using the groove method.
See my earlier posts about the extractor length and the cutter.  I am about 50% complete on a Bonelle tool and cutter grinder, quorn owner\'s group, yahoo.
There is a very good article about silver solder in the book by Kozo Hiraoka, \"The Pennsylvania A3 Switcher\". If I follow these instructions everything works well, if not disaster.
I had a problem with the center line of the gears on the body.  I used the soldered body and followed the instructions.  I bored the drive shaft tube first and then soldered.  After assembly I found that the gears bound.  I corrected this by making a new cocking ring with the center hole offset by the amount of the error.  I have since made several cocking rings and experimented with bearings.

  • Guest
D&E .22LR 1874 Gatling Gun Build
« Reply #53 on: April 07, 2011, 05:49:21 AM »
I used the soldered body.  I bored the drive shaft tube first and then soldered.
On a rebuild I would use a solid tube and then bore it out.  This would assure the position of the center line of the gears.
On a rebuild I would make two oscillator brackets and use one temporary for the front of the body.  I would mill them flat after soldering so as to have a datum for measurements and a flat to clamp into the the mill vise.  Remove the front bracket after all milling and fitting.
On a rebuild I would consider making the body a larger diameter as I had trouble with the threads for the cascabel plate.  I cut a little too deep and the thread showed through in the groove I milled for the body side rails.  The instructions say to cut a flat for the rail and they also say to radius the rail on one side?
I am sure you cast the body.

  • Guest
D&E .22LR 1874 Gatling Gun Build
« Reply #54 on: April 07, 2011, 06:13:51 AM »
I have experimented with ways to lessen the spring pressure on the crank handle and stop misfires.
By using the 4mm square firing pin I was able to make a rectangular pin and have the pin strike the rim in the same place each time.  I turned the pin one piece.  I used a solid end and a bearing.
In stead of using stronger springs I tried to lessen the friction.  I used bearings on the end of the pins and cut the cocking ring to match the bearing.  I used bearings on the shaft.  I used a thrust bearing in the cocking ring.  I tried to use UHMW plastic for the end of the pins but I could find no way to get it to stick.  I made cocking rings out of UHMW plastic but they would not hold up to the thrust.  I made laminated cocking rings out of brass and UHMW plastic with the same results.
Before I stopped on the ggun and started the Bonelle I made a cocking ring with a curved linear ball bearing.  Works good but need to change dimensions.
I have tried to measure the force required to crank the handle so I can have some better reference than my hand but I have not found a scale with the amount of range needed.
The best combination was with a UHMW plastic cocking ring, thrust bearing and a bearing on the firing pin.  This worked well until it destroyed itself.  I tried to work within the given dimensions so that other parts did not need to be changed.
When I start a rebuild I am going to use all the experiments that worked and change the dimensions and materials if I can solve the cranking pressure problem.

  • Guest
D&E .22LR 1874 Gatling Gun Build
« Reply #55 on: April 14, 2011, 07:31:12 PM »
[
Although ive not had any issues as far as turning the mechanism yet, I\'m beginning to worry that I will.
It\'ll take some inventive mounting for me to mount the barrel assembly in my dividing head and be able to mating out the relevant sections, although I think that is the best idea. At first I didn\'t see the problem with the extractor rubbing the threads on the breach ring. Another solution would be to extend the outer diameter of the groove to take off the entire edge of the barrel and threaded hole.
I have got a cast body, but will still have to mill out the holes for the shaft. I\'ve also got a large lump of brass to machine a body if need be.

I really don\'t want to have to make another cocking ring although cleaning up the casting is a lot of work so I guess it may be easier long term if need be.

I redesigned my cascabel plate so that it used the same threads as the cocking ring. I thought it made sense.
Unfortunately, I didn\'t allow enough machining on the cast parts and I\'m having to juggle dimensions for the thread in the body. I may have to remake the cascabel plate.

I like the idea of utilizing bearings and will try and do that still. I think all the places youve suggested i\'ll try straight away. Do you have links to the bearings you used? I\'m learning a lot and will utilize a completely different design on my next Gatling!

Once ive worked out what size I\'m making my body thread, I\'m going to start machining that. I guess that\'s when I\'ll realise what problems I\'ve got. I can see a lot of lapping of parts In the future.

  • Guest
D&E .22LR 1874 Gatling Gun Build
« Reply #56 on: April 16, 2011, 07:59:08 PM »
pmecer,

A better way to bore the extractor holes would to be use the lathe.  While making the Bonelle I had to bore two paralel holes.  My lathe has a flat cross slide.  I made a t-nut table to bolt onto to the cross slide.  I will make a longer t-nut table and mount the barrel assembly and the dividing head on it.  The barrel ring will be held by a steady rest.

I will not use the grooved ring as I am sure it was only for grooving the barrels.  This way the barrels will not have to be removed once bored.

The body should have some sort of flat to use as a datum for mounting and measuring.  I made mine out of centerless brass.  I made the dimension to the gears wrong so I had to make the hole in the cocking ring off center.

The cocking rings are easy to mill.  I could not find the cutter called for so I used the closest one I could find.  After changing the firing pins I made several more of different sizes.

I got the bearings from vxb.com and mscdirect.com.  As I used several different sizes as I changed things the part numbers would not be of use.  I am going to use a needle bearing for the front shaft.  This will require the rail front to be larger.  I did not have the CD plans when I first made this so I made my jig out of wood.  I will use a three piece thrust bearing for the main shaft.  One race will be recessed into the cocking ring.  The bearings and the other race will be in the bolt carrier.  
I will use a sealed bearing for the main shaft to turn that will be set into the other end of the cocking ring.  I am going to use bearings in the drive shaft, will have to make the tube larger.  Other sites I find useful are grizzly.com, shars.com, surpluscenter.com, littlemachineshop.com.

I tried bearings on the bolts.  This made the action smoother but there was not enough material on the bolts.  They would break after a few firings.  I would like to use these bearings but it will require that the whole firing parts be redesigned.

I put bearings on the end of the firing pins.  I turned the pins out of 4mm stock, pressed on the bearing with locktite and then peened over the top.  They have not come off.  I used the 4mm square stock so I could make non rotating pins and shape the firing end to a rectangle.  This helped a lot with the misfires.  ( I needed a 4mm square hole for another project so I used my broach.  It cut well in the brass firing pin retainer but I broke it in two with the steel part.)

I made the linear bearing using balls from MSC and a 1/16th ball mill.  This works but needs to be refined.

I like you drawings, what program do you use.  I need to learn how to use 3D.

I am sure someone has made this ggun but in the posts I have read no one has said their gun will rapid fire a full 50 round magazine without a misfire.

  • Guest
D&E .22LR 1874 Gatling Gun Build
« Reply #57 on: November 07, 2011, 03:12:14 PM »
Steve,

I\'ve read your posts many times and will certainly be using a lot of your ideas and suggestions. I\'ve not managed to do any work on my Gat in months but do think about it a lot. ;-)

I use Magics which is a CAD tool mainly for repairing files rather than designing parts. I\'ve got a full version from a previous employer but there are disks available from the manufacture that have a sample version on them - all the functions you will need will be available. ;-)

I need to spend some serious time sitting in front of my software making sure I\'ve incorporated all the modifications that I need to.

I\'ve also just invested in some new tooling - a quick change tool post and a live Center in preparation for the next stage.

Hopefully I\'ll get to do some work on it soon.

  • Guest
D&E .22LR 1874 Gatling Gun Build
« Reply #58 on: November 08, 2011, 11:48:07 AM »
Hey, Pmercer.  
I have been waiting for you to post again.  Hope you are well.
I have not worked on the ggun since I started on the Bonelle tool and cutter grinder.  I am about 80% complete.
I have used my converted mill for sharping many times.  The grinding wheel is horizontal and I can see the grinding action.  This is good because it requires less adjustments.  The wheel on the Bonelle is vertical and I cannot see all of the action.  I feel this may be a major problem when I am finished.
Have had many other things to do.  I am repairing a house so I can rent it.  Made a few other tools for use with the ggun rebuild.  I have been thinking about using chrome plating on the firing pin parts.
Have not decided to start on the rebuild yet.
One problem with the main shaft parts was that they needed to be pinned or keyed to keep the parts from moving.  I found a Rhodes shaper, slotter so I bought it to use for the interior slots or key ways.  I have an Atlas 7\" shaper but the slotter is vertical and is easier for some slots.  I have used it several times for small interior key ways, nice machine.  I am going to use key ways on a rebuild.
One thing I did not mention before when I talked about making the main shaft was it\'s length.  The slack in it\'s length will affect the fitting of the bolt length and add to the misfiring problems.  More on this later.
I found that Google Sketchup 8 was a free 3D modeling program.  I downloaded it an have made several drawings of the machines I was building.  It is easy to learn and to understand.  It seems to be a complete program and a professional
version is available for sale.
Check out this site, metallmodellbau.de.  This guy does beautiful work.

Offline Sparky_NY

  • Sr. Member
  • ****
  • Posts: 481
D&E .22LR 1874 Gatling Gun Build
« Reply #59 on: December 26, 2014, 09:04:31 AM »

What ever happened to Pmercer and his gun?    It was 3 years now since the last post and the gun was nearing completion.     Quite a few builders seem to fall off the earth after getting a large percentage completed.