Author Topic: D&E .22LR 1874 Gatling Gun Build  (Read 46238 times)

  • Guest
D&E .22LR 1874 Gatling Gun Build
« Reply #20 on: February 05, 2011, 07:53:04 AM »
Very nice work Pmercer. I haven\'t been on the site for some time. The problem that people had mostly with the D&E is to get it to fire all the time due to all the bolts are at some stag of cocking at one time causing the gun to be difficult to crank. Then when the firing pin springs were lightened the gun didn\'t fire. The RGG gun cocks one bolt at a time making it much easier.
Bill

  • Guest
D&E .22LR 1874 Gatling Gun Build
« Reply #21 on: February 05, 2011, 12:39:23 PM »
\"Each part is simplified as with the original Gatling system which was a Marvel of Simplicity\".  Quote by Douglas Schneider included with the plans for his gun.

I am a simple man, I thought.  This looks like a good project.  It is within my skill level, tools and budget.  Since I had this thought I have spiraled down into the depths of a ggun addict, buying tools, materials, reading the internet, and thinking of nothing else except gguns.  Beware the evils of the D&E gun.

I, too, have encountered every problem that everyone else has with the firing of the gun.  I reached the point where I had two guns ready to test fire.  Insert a round, turn the handle and nothing.  

I have built and rebuilt enough parts to make several more guns.  I have worked and reworked parts to destruction.  I have spent three times my original budget.  I have some new tools (which is always good).  I have new experience and a constant headache.  

What I do not have is a ggun that will fire two rounds in a row.  I have not completed the gun.  It is ready for the yoke.  I have it on a temporary wood stand for testing.  If anyone is interested I can identify the problems and explain the steps I took to solve them.

  • Guest
D&E .22LR 1874 Gatling Gun Build
« Reply #22 on: February 05, 2011, 06:27:31 PM »
YES, we are interested as I know that I am anyway. I know that the firing pins need to be perfectly true when soldered into the hammer shafts or they will drag enough to slow and weaken the strike on the rim. A heavier spring doesn\'t hurt either if you are willing to bore out the bolts a little more.
bruski

  • Guest
D&E .22LR 1874 Gatling Gun Build
« Reply #23 on: February 06, 2011, 05:43:00 AM »
I didn\'t realise there were issues with the D&E gun firing. When I bought the plans they were the only company that I could find selling them. I\'ve gone too far with it now to even consider stopping or changing to a different design.

I would be very interested in hearing what problems you had and the solutions!!

  • Guest
D&E .22LR 1874 Gatling Gun Build
« Reply #24 on: February 06, 2011, 12:38:03 PM »
Pmercer,

Your post has already mentioned three of the problems, the cutter, the bolt carriage and the pinning of the barrel assembly.  I have many more.  I will start with the cutter because it can be separated from the rest of the parts.

The cutter was an intimidating little thing as I have not made a cutter before and of its size.  I made several out of oil hardening drill rod.  I cut them on the mill using a dividing head.  I had to buy a 40-1 dividing head for this project as my rotary table was 90-1.  I had no way to sharpen them so I cut them to size, hardened them and touched up with a stone.  I made the radius on the lathe with a file.  I made a radius gauge by drilling a hole in a piece of brass and cutting it in half.  The first cutter I made was the best.

I had only made 10 bolts at this time so I sacrificed one for a test cut.  After ruining several bolts I stopped.  The radius portion of the cutter worked good but the shaft portion dulled fast and burnt the bolt.  I could not make a cutter that would make both cuts on two bolts in a row.  I stopped working on the ggun and went to the internet.

I started looking at small tool and cutter grinders and found the Quorn.  I started gathering materials and bid on the castings on ebay several times with no success.  One day at Harbor Freight I was looking at the mini mills.  The costumers at Harbor Freight love to take any part of a machine that will come off.  I remembered a comment from the internet that it was possible to make a tool and cutter grinder by converting a mini mill.  The manager had a returned mill and I bought it.

I modified the mill so it would rotate in three axis.  I made end mill holders to sharpen the ends.  I made a three axis holder using 5C collets.  I made a rotary table with a 5C collet holder.  I made an air bearing to sharpen the spirals.  I still plan on making a Quorn.

Using this I made more cutters.  I ground them from broken HSS end mills.  It was then that I saw that it would be much better to make a single cutter and use an end mill to cut the shaft portion of the bolt.  I was able to grind a radius cutter to the correct size.  As it was HSS I have not had to sharpen it yet.  I can only get one sharpening before it would be too small.

I divided the cutting of the extractor into two stages.  I made a fixture to hold the bolts so I could index them and make multiple bolts at a time.  I would cut the shaft portion first and then cut the radius portion.  As the fixture was already centered all I needed to change was the end mill to the cutter.  The bolts were already cut to final length.

I divided the cutting into two stages because I could not get a bolt to the correct length to touch the round and the correct length to clear the barrel and eject a round in one pass.  I am sure it is possible but I could not do it.  I tried adjusting the spacing between the bolt carriage, pan and the barrel ring.  I made partially completed bolts to use as gauges.  The sequence that worked was to get the three parts in place and tightened.  Place a round in the barrel.  Use a bolt without the extractor and trim a little off until it fit against the round and everything would rotate with no interference.  This is the length of the bolt to the point of the extractor.  Next I cut the extractor groove on another bolt a little deep so it would not touch the rim of a round.  This is a guess at this time because what I was trying to find was the depth of the shaft cut.  I placed a round in the pan and brought the bolt up to it.  I measured the distance from the top of the extractor to the shaft of the round.  I then cut the shaft portion of the extractor using this measurement.  I repeated the process until the round rim would fit in the extractor groove and the extractor would fit over the round.

The last step was to fit the extractor into the space provide by the barrel.  I used the same bolt to determine the correct length of the extractor.  It must fit into the barrel space without touching the barrel.  Then I put a round in the pan and inserted the bolt and turned the handle and observed for any interference.  The extractor must come over the top of the rim of the round, then the shaft must push the round into the barrel and set into the barrel space.  All this was done without the firing pin.  I repeated this for each bolt when I encountered another problem.  The round would constantly catch on the barrel and stop the action.

As this is not connected with the cutter I will stop here.  Check out GatChat and the Gatling group on Yahoo.  I did not take pictures as I did not have a camera.  (I can not find the spell check).

  • Guest
D&E .22LR 1874 Gatling Gun Build
« Reply #25 on: February 07, 2011, 05:51:13 AM »
Bruski,

I followed the suggestions and made the first set of pins by soldering.  I did not like them so I made the pins I now use out of one piece.  The springs I have tried are from MSC.
1.  .240 x .026 x 2
2.  .300 x .032 x 2

The springs mentioned on the yahoo group are that worked are .300 x .032 x 1.75 also from MSC.

I have more on the springs later.

  • Guest
D&E .22LR 1874 Gatling Gun Build
« Reply #26 on: February 09, 2011, 05:25:29 PM »
Steve, Did you have any other problems with your gun firing on all ten? I am wondering if there might be a problem with the cam followers or the rear cam getting damaged from the beating of the larger cartridge?
bruski

  • Guest
D&E .22LR 1874 Gatling Gun Build
« Reply #27 on: February 09, 2011, 06:53:27 PM »
There is cordite at the end on the barrel.  I just achieved rapid fire.  I was able to fire three rounds in a row.

After my last post I changed directions and experimented with the firing pins.  I used the 4mm non rotating pins first.  I filed the end to a rectangular shape about half the area of the round end.  I had less misfires.  Then I used a 5/16\" x 1/8\" bearing instead of soldering a steel end.  This made a much smoother action.  I attached the bearing with Locktite and by peening over the shaft.  I had to enlarge the groove in the cocking ring to match the size of the bearing.  Less misfires again.

I have tried brass and UHMW plastic for the ends of the pins.  I like the plastic but have not found a way to keep it attached it to the shaft.  It keeps coming off.  The bearings work best.

I am trying to find things that work so I can do a rebuild.  I have not fired 10 shots in a row.  I am using .22 shorts.

I am sure that most of the firing problems I am having are because of the bolt carrier.  The holes may be over sized.  They may not be in true alignment.  They may not align exactly with the pan and barrel ring.  

I have enlarged the hole in the bolt to a Q drill to allow for the spring.  I have made the firing pin retainer and the spring retainer of UHMW plastic.  I like the way the plastic feels but it is difficult to remove a small amount of material because it is made to resist abrasion.  It cuts well but is very difficult to file.

I have hardened the end of the pins and the ejector portion of the bolt.  I have tried using a bearing instead of the lug on the bolt.  It works well but the holding peg keeps breaking because of the firing force.  Other builders say they have done a lot of filing, fitting and polishing.  I am assuming that they are doing the same things I am doing.  I have done everything I can think of, I have one idea left to try and then I will decide if I am going to do a rebuild.  I talked a little about the bolts.  I have a lot of trouble getting the bolt to eject after getting it to fire.

You will need to make some kind of bullet trap in order to test fire while you are building.

It is possible to make this gun as other people have been successful.  It might just be beyond my skill level?

  • Guest
D&E .22LR 1874 Gatling Gun Build
« Reply #28 on: February 09, 2011, 08:45:02 PM »
When I encountered the firing problem the first thing I did was to rebuild the cams.  Mr. Schneider had said that the cams needed to be machined following his instructions or there would be jambing.  I made the cams out of brass and steel.  They were not the problem.

I have no experience with larger calibers.  The cams are held in place with screws.  The rear cam takes the force of the shot.  I would think there are only two ways to make them stronger, that would be to add more screws or to solder them in place?

  • Guest
D&E .22LR 1874 Gatling Gun Build
« Reply #29 on: February 09, 2011, 10:01:04 PM »
My bullet trap is a double walled ice chest filled with clean sand. Does the job without leaking sand onto my shop floor.

  • Guest
D&E .22LR 1874 Gatling Gun Build
« Reply #30 on: February 10, 2011, 08:06:46 PM »
Lots of good chat here. ;-)  Hard plastic can be tricky to file, but it will generally sand with sand paper.

I\'ve pretty much finished playing with my CAD models. I\'ve had to lenghthen the SHAFT, FRONT SHAFT and BARRELs. I didn\'t model the height adjuster screw but may do so. Also, the odd nut and bolt are missing.


  • Guest
D&E .22LR 1874 Gatling Gun Build
« Reply #31 on: February 11, 2011, 02:23:51 PM »
Pmercer,

Will you describe your lapping process for the bolts and the bolt carrier?

  • Guest
D&E .22LR 1874 Gatling Gun Build
« Reply #32 on: February 12, 2011, 12:45:11 AM »
Lapping BOLTS into BOLT CARRIER.

Tools: marker pen, file, sandpaper, large tub of patience.

I machined my BOLT CARRIER so that was the most accurate part with nice straight \'bolt holes\'. My BOLTS were cast so they were never going to be 100% perfect. For this reason all lapping was done on the BOLT, not the BOLT CARRIER.

I filed the bolt surfaces as straight as possible and then clamped them in a vice. I then used a strip of sand paper which I looped round the bolt and pulled back and forth. This enabled me to get them nice and smooth, and by doing it this way I ensured that I didn\'t put any flat edges on them. I paid good attention to the bolt body around the recoil lug although I have done little work to the lug itself. I\'ll do that later to make it fit perfectly in with the BODY and CAMS.

I then put marker pen all over the BOLT and also all in the \'bolt holes\'. By doing this I could see where I was getting interference. At first the BOLT would only go into the BOLT CARRIER  a short distance. I removed the bolt and put it back in the vise where I used a strip of sandpaper to work the area where contact was made.  Perceverence meant that slowly the bolt went in further and further. Eventually the bolt was a lovely smooth fit with no resistance.

  • Guest
D&E .22LR 1874 Gatling Gun Build
« Reply #33 on: February 12, 2011, 03:17:59 PM »
HI, Your way is probably the right way of lapping in the bolts. Another way is to put a little bit of rubbing compound or valve grinding compound in each hole and work the bolts in and out until smooth as a babies bottom. bruski

  • Guest
D&E .22LR 1874 Gatling Gun Build
« Reply #34 on: February 12, 2011, 06:24:46 PM »
Hey Bruski, I finished them off with valve lapping compound. I forgot about that. It works very well that way.

  • Guest
D&E .22LR 1874 Gatling Gun Build
« Reply #35 on: February 23, 2011, 05:18:40 PM »
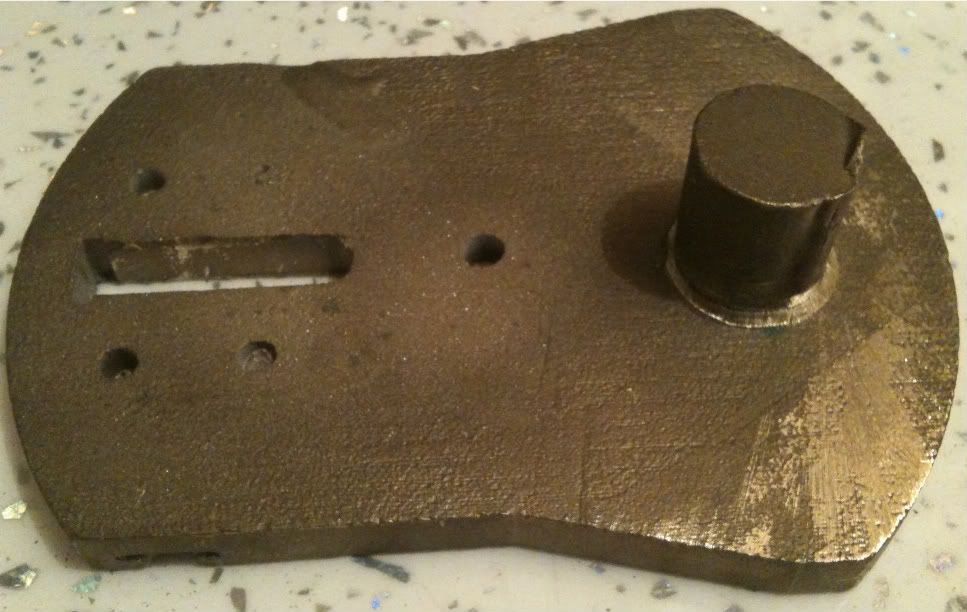
Because it\'s cold outside in the garage/workshop, I decided to work on a components that I could do inside. I decided to do some work on the BASE PLATE. The BASE PLATE bolts onto the top of the TOP COVER to allow the BROADWELL DRUM to be fitted instead of using a stick magazine.

The BASE PLATE was one of the components that I decided to cast. In hind sight......

This is the underside of the BASE PLATE. In this photo you can see the sprue where it was cast (I\'ve already cut it off and placed it back in position for the photo). You can also see where holes should have been cast. Most of them are almost all the way through, but one of them you can only just locate.


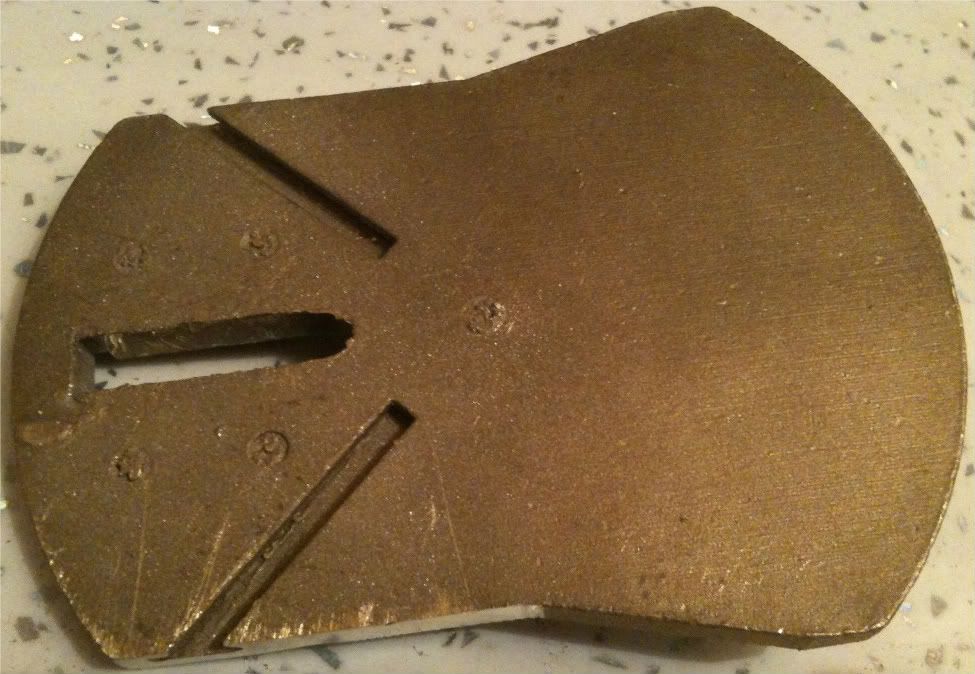
This is the top of the BASE PLATE. In this photo you can see the two slots that the KEY,SHORT and KEY,LONG slide into. Well, they should slide in. The slot that the round of ammunition drops through is very well formed, but the flashing disguises that.


I\'ve cleaned up the BASE PLATE and KEY,LONG and they now fit together nicely. The surface looks awful, but is very flat and has been finished with 150 grit so far. I\'ve not cleaned up the hole that the round of ammunition drops through as once the BASE PLATE is bolted to the TOP COVER there may be a slight mismatch. I\'ll finish the hole off once both parts are bolted together.


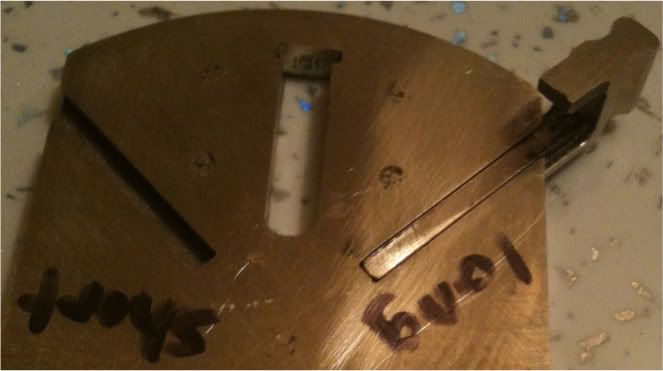
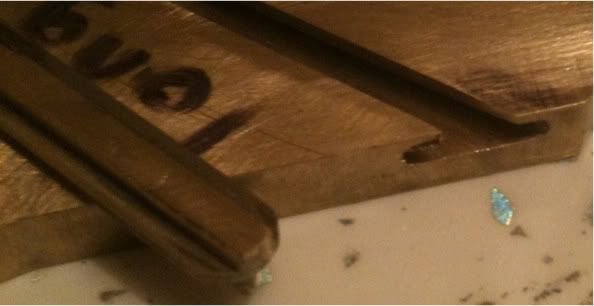
Here\'s the BASE PLATE and the KEY,LONG. You can see that the end of the KEY,LONG is rounded, whereas the end of the slot is square. I\'m not sure I like this so may modify one or the other. On the flip side, this joint wont be seen once the BROADWELL DRUM is in place.


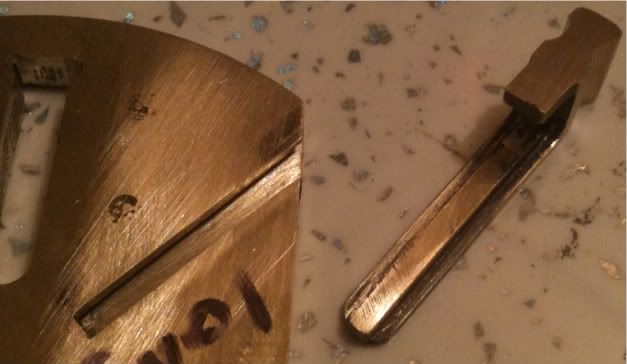
Here you can see the cross section of the two parts.


How did I get the two parts to fit? The slot was nowhere near as well formed as I\'d hoped. I used a small needle file, a small dremmel with a modified cutter and lots of patience. In hind sight, I should have bit the bullet and machined this part from solid. I decided to cast it as I knew I wouldn\'t have access to a mill when I came to machine it. As it happens, I\'ve got a big pillar drill and a compond table so I could well have machined it at home. I\'m considering machining some of my other parts that I already have castings for, since machining a casting is a nightmare and very hard on cutters because of the ceramic on the surface.

I\'ll do a write up on using cast parts in a fresh thread and put a link to it here:

  • Guest
D&E .22LR 1874 Gatling Gun Build
« Reply #36 on: February 26, 2011, 08:03:11 PM »
Barrels. What an ass ache. I bought my barrel blanks a long time ago. They were something like 500mm long and 25mm diameter. I skinned them down to something like 12mm OD and 420mm long and machined each end and left them. They can be seen on the first page of this thread. I did all 10 barrels in one 8 hour night shift at work. ;-)

It should be noted that I am fairly compentent on a lathe having used a harrison M300 for years. This is a new Chicom lathe and I\'ve hardly used it. Also most of my insert tools don\'t fit in this lathe which is annoying so I\'m having to grind tool steel up.

I\'m now at the stage where I need the barrels finished. Yesterday I went down to the garage with all 10 barrels and a whole day free. Once I start on the lathe I\'ll generally go non stop all day, so expected to have finished all 10 by the end of the day. That was 10 tapers to cut and 10 screwcut operations. Easy.

Like Hell. I decided to offset the tailstock to do the tapers which meant the fixed steady and the moving steady were out of the question, meaning lots of vibration and lots of swearing. In the end I found that I can do the whole barrel length in one cut if I had an rpm of 200, a slow feed and a 0.1mm cut. Each cut takes 24 minutes, Yep, you read it right, twenty four minutes. I\'ve never had to do such a ridiculous cut!! I managed to get the taper done on one barrel in 6 hours.

Today, I decided to use the fixed steady and cut the barrel to within 0.6mm of the final taper diameter. I took 0.2mm cuts at 500rpm and a nice high feed rate. I placed the steady all the way to the right allowing me to cut about 60mm of barrel. I then moved the steady 60mm left and turned down to within 0.6mm of final taper diameter. Once I\'d done the whole barrel like this, I then did 6 cuts at 0.1mm / 200rpm / slow feed. I finished my second barrel in about 3.5 hours which is a large improvement.

Normally I\'d be very annoyed at having to stand watching a lathe for 24 minutes, but I\'ve got so many other parts to make, I\'m just spending the 24 minutes working on other parts on the bench next to the lathe.

Has anyone else found that the barrels have been harder than they thought???

  • Guest
D&E .22LR 1874 Gatling Gun Build
« Reply #37 on: February 27, 2011, 02:32:17 AM »
You experience mimics mine exactly, long, skinny and prone to chatter. Had to take light cuts, slow feed with very sharp radius tools. Ended up with a reasonable finish but require a lot of filing and sanding pre-polish. I remember about 16 or 18 minutes per cut.

I also noticed that the barrels varied in hardness. I made 12 barrels, 0-9 and x,y. I used takeoffs and have (1) Winchester, (3) Springfields, (1) Sears and (7) Ruger 10-22\'s. The Winchester, Springfileds and Sears were Gun Show refugees and the 10-22\'s were bought from the classified on Rimfire Central. I averaged $17.75 ea for the 12 barrels.

I have noticed a difference in the machining quality of the barrels, some cut smooth and easy and some not so much. Even the Ruger barrels varied a lot. My group at work has a Niton XRF Gun that can sample chemistry non-destructively. When we shot the barrels with the Death Ray Gun they all were alloy steel but some were leaded which would explain the ease of machining. The hardness also varied significantly.

nitewatchman

  • Guest
D&E .22LR 1874 Gatling Gun Build
« Reply #38 on: February 27, 2011, 01:53:04 PM »
I did my 3rd barrel today. Wish I\'d done a 6 barreled gun now instead of a 10 barreled one. lol.

I\'ve done a write up on how I turned the barrels. It can be found here.

I bought my barrels from Numrich I think. They were all blanks and the same but it was easier for me to order them all in one go as I had them sent to a friend in NYC and then he shipped them over to the UK for me.
They machine fairly well, dont seen to case harden (thankfully) and they\'ve been sat for 4 years, untreated in the garage since I skinned them down and there\'s no sign of rust on them. I wanted stainless barrels, but couldn\'t find any at the time. These must be some sort of chrome vanadium ??? and although not as shiny as stainless, do have a nice dull shine to them.

A couple of posts up I said I\'d put in a link to a casting discussion but am unable to edit my posts. It can be found here. I struggled to say what I meant but hope you get the idea. :-)

  • Guest
D&E .22LR 1874 Gatling Gun Build
« Reply #39 on: March 02, 2011, 01:11:03 PM »
Nitewatchman, is the finish on all your barrels the same or have you treated them in some way? Thinking back, I toyed with the idea of sourcing barrels from all over but decided I wanted one source in case they finished differently.

I finished turning my 4th barrel today and started on the 5th. Still got all the threads to cut and also got to chamber them still. I won\'t chamber them till much later though.